Blinds Express | Custom Discount Blinds | Calgary AB
** Showroom Hours : In order to serving our clients better, we will take appointment only for visiting our showroom.
Top

How to Measure your Windows

General Overview:
Measuring your windows for Blinds, Shades or Interior Shutters is easy. Let's start with a few general rules that apply to all of the window treatments we sell. Remember, it's best to measure TWICE and order ONCE.

Rule 1. Always use a steel tape measure. Never try to measure your windows with a cloth tape, ruler or yardstick.

Rule 2. Measure down to the nearest eighth of an inch and do not round your measurements. Meaning don't measure 35 3/8" and call it 35" or 36".

Rule 3. When writing down your measurements be sure to indicate which measurement is the width and which is the height and ALWAYS note the width first, then the height. A common mistake customers make is transposing the numbers. Be sure not to get them backwards. Since these are custom made products it's generally very hard to have a size modified and can get costly to have them remade.
Measuring Example: your window is 36 3/8" wide by 60 1/4" high (tall). Think of it in these terms, Width is horizontal (horizon) left to right and height is vertical top to bottom. Your written measurements would look something like this... 36 3/8" x 60 1/4"

Rule 4. Inside Mount Only - Do NOT take any deductions . Our factory takes those allowances. You need to provide us with your EXACT WINDOW SIZE OPENING, do not use the size of an existing blind in that window. If you take your own deductions and then order as an inside mount you will get a double deduction when the factory also takes an allowance meaning your window treatment will not fit properly and you will have a larger gap between the treatment and the window opening.

Rule 5. Outside Mount Only - You need to provide the exact overall blind size needed (by adding the necessary coverage to the width and height of opening). Our factory makes most outside mount blinds the exact width and height you specify. NOTE: The height includes the OVERALL blind which includes the headrail, etc. One of the few exceptions are roller shades which the width is generally made as a tip-to-tip size. Meaning the fabric width is generally smaller than the width of the roller tube and bracket tabs. Since there is generally no deductions made on outside mount blinds, do not order your blinds as an outside mount if you are installing them inside a window opening as they will not fit. The blind cannot be the same exact size as the window it will be installed in as there must be room for hardware and clearance. Outside mount applications are usually used for windows that do not have an inside area, like a patio sliding glass door for example.


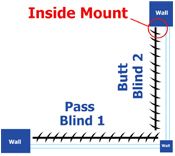
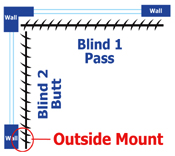
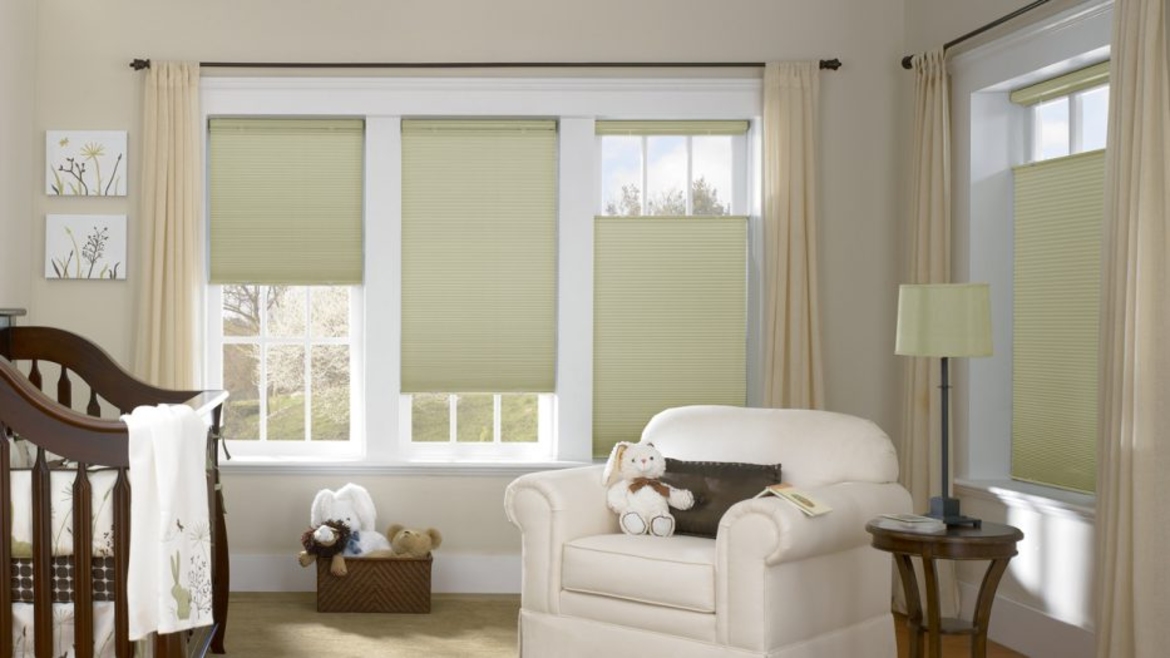
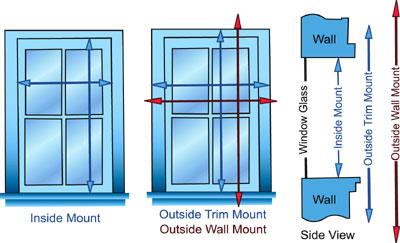
Choose Inside or Outside Mount:
Before taking any measurements, step back from your window and decide if you want to mount the window treatment inside the window recess or outside on the wall or molding. For an inside mount, the window opening must have enough unobstructed depth to allow mounting. Be sure to look for obstructions like window locks, window cranks, etc.

Tip: For a flush inside mount (the blind completely recessed so that no part of the blind projects out of the opening) check that you have enough depth and make sure that if a valance is included that we make it slightly smaller than the window opening width since they are normally made an inch or two wider.

Tip: We usually recommend an inside mount whenever possible because it provides a cleaner look. However, an outside mount can make a window appear larger or hide an unattractive window. When you specify inside mount, we will make a size deduction to allow for operating clearance. With most products we will deduct up to 1/4" from each side. Roller shades also have a rather large fabric and roller tube deduction (see product specs tab on product pages). For vertical blinds there is also a height deduction of 1/4". The deductions are made so that the blind will not rub or scratch your window frame. If you specify an outside mount, we will not take any size deductions. Your blind will be made at the exact size you specify. So you must ADD to the opening measurement to allow for overlap and mounting brackets. When measuring, don't be surprised if your windows are not square. It's not uncommon and probably won't be noticeable.


Measuring for a French Door


When ordering for a french door blind select Outside Mount and give the exact measurements that you want the blind or shade to be, not the size of the window or glass. The overall size of the blind or shade is up to you, just make sure you avoid any obstructions such as lever door handles (see obstructions in pic on right) or window cranks and allow for proper window light coverage. We also recommended you order hold down brackets to prevent your window blind from swinging around when you open and close the door.
One other important note: Stand back and look at the door from the inside of your home. Note which side is hinged and which side has the door knob/handle. Be sure to specify that all controls be located on the hinged side if at all possible. If the controls are not ordered on the hinged side of door then it's possible that the lift cords, etc may swing out into door opening and get slammed into the closure when closing the door. Example: Picture on right shows the lever handle on right side of door so you would want to order your controls on the left for this application.

Width: To minimize light gaps, measure the width of the glass pane and add some additional width but make sure that it will be free from any obstructions. Our recommendation is to add at least 2 to the width (1" on each side past the glass pane or trim if possible).

Height: Measure the height of the window glass/trim and add at least 2 1/2 at the top to allow room for mounting hardware and 2 below the bottom of the glass/trim to ensure proper coverage and to allow for the hold down brackets to be mounted. Your total height addition should be at least 4 1/2" to allow for proper coverage.

How to Measure for an Inside Mount Bay Window

Measuring for Bay Windows can be an easy task if you follow our directions. Generally, even with the most precise measurements there will be light/privacy gaps in the corners. This should not be considered a measuring mistake. It happens because when two blinds or shades meet in a corner only the front edges meet up and the blind or shade itself is normally slightly smaller in width than the headrail.

To start measuring you need the depth of the bracket/headrail for the blinds type you wish to use. Select the product you are using in the Bay Window and write down the depth value associated with it.


Product: Depth Value:
2" & 2 1/2" Blinds 2 1/2"
1/2" & 1" Aluminum Blinds 1 3/4"
1" Wood Blinds 1 7/8"
3/4" Cellular Shades (Std. Lift) 2 1/4"
1/2" Cellular Shades (Std. Lift) 1 7/8"
3/8" Cellular Shades (Std. Lift) 1 7/8"
Cellular Shades (Premium Lift/Cordless) 1 5/8"
Pleated Shades 1 1/2"
Roman Shades 1 7/8"
Bamboo Shades 2 1/4"
Roller Shades (w/Clutch & Windows less than 60" wide) 2 1/2"
Roller Shades (w/Clutch & Windows 60" or greater wide) 3 1/8"
Sheerweave Shades (Windows less than 60" wide) 2 1/2"
Sheerweave Shades (Windows 60" or greater wide) 3 1/8"
All Vertical Blinds 3 1/4"
Window Shadings 3 1/8"


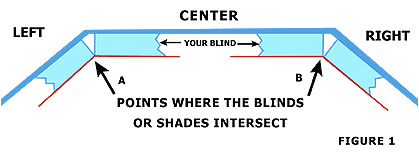
Now measure the widths of each blind needed for the Bay Window.
1. Where the Left section of the window meets the Center section: From the Left window Section, Measure out the distance of the depth for the blind type you are using. At this point make a small mark on your ceiling demonstrated by the red line on figure 1.
2. Where the Center section of the window meets the Left section: From the Center window Section, Measure out the distance of the depth for the blind type you are using. At this point make a small mark on your ceiling demonstrated by the red line on figure 1.
3. At the point where these two marks meet is the point where the blinds will butt up against each other. This point will be point A.
4. Where the Right section of the window meets the Center section: From the Right window Section, Measure out the distance of the depth for the blind type you are using. At this point make a small mark on your ceiling demonstrated by the red line on figure 1.
5. Where the Center section of the window meets the Right section: From the Center window Section, Measure out the distance of the depth for the blind type you are using. At this point make a small mark on your ceiling demonstrated by the red line on figure 1.
6. At the point where these two marks meet is the point where the blinds will butt up against each other. This point will be point B.
7. Now Measure the distance from point A to point B. Subtract 1/8" from this distance and that is the width of your Center blind (Shown in Light Blue in Figure 1).
8. Measure from the left side of the left wall to point A. Subtract 1/8" from this distance and that is the width of your Left blind (Shown in Light Blue in Figure 1).
9. Measure from the right side of the right wall to point B. Subtract 1/8" from this distance and that is the width of your Right blind (Shown in Light Blue in Figure 1).
10. Order as Outside Mount (so no deductions are taken by the Factory) and in the 'Notes Section' of the order page request Inside Mount Brackets if mounting to the ceiling or top of window opening.


How to Measure for a Corner Window

Listed below is the headrail depth for all the products on our website.
1" Wood Blinds - Depth: 1 7/8"
2" and 2 1/2" Blinds - Depth: 2 1/2"
1/2" and 1" Aluminum Blinds - Depth: 1 3/4"
3/4" Cellular Shades with Standard Lift - Depth: 2 1/4"
1/2" Cellular Shades with Standard Lift - Depth: 1 7/8"
3/8" Cellular Shades with Standard Lift - Depth: 1 7/8"
All Cellular Shades that have Premium Lift or Cordless option - Depth: 1 5/8"
Roman Shades - Depth: 1 7/8"
Bamboo Shades - Depth: 2 1/4"
Pleated Shades - Depth: 1 1/2"
Roller Shades (windows less than 60" wide) - Depth: 2 1/2"
Roller Shades (windows 60" or greater wide) - Depth: 3 1/8"
Sheerweave Shades (windows less than 60" wide) - Depth: 2 1/2"
Sheerweave Shades (windows 60" or greater wide) - Depth: 3 1/8"
All Vertical Blinds - Depth: 3 1/4"
Window Shadings - Depth: 3 1/8"


Inside Mount: see picture on right ---->
Blind 1 on 1st Window (The "Pass" Blind)
WIDTH: Measure the exact width of the window opening. This is the width of Blind 1.
HEIGHT: Measure the height of the window opening. This is the height of Blind 1.

Blind 2 on 2nd Window (The "Butt" Blind)
WIDTH: Measure exact width of the window opening. Find the Product you are measuring for from the chart above and deduct its depth from the width you just measured. This new value will be the Width of Blind 2.
HEIGHT: Measure the height of the window opening. This is the height of Blind 2.


Outside Mount: see picture on right ---->
Blind 1 on 1st Window (The "Pass" Blind)
WIDTH: Measure from the corner of wall to desired width of the blind. This is the width of Blind 1
HEIGHT: Measure the height. Add a minimum overlap of 5" height, 3" to top and 2" to the bottom. This will allow the blind to cover the window and allow for maximum window coverage. This is the Height of Blind 1. (Note: If the window sill protrudes then add only for allowance above the window.)

Blind 2 on 2nd Window (The "Butt" Blind)
WIDTH: Measure from the corner of wall to desired width. Find the Product you are measuring for from the chart above and deduct its depth from the width you just measured. This new value will be the Width of Blind 2
HEIGHT: Measure the height. Add a minimum overlap of 5" height, 3" to top and 2" to the bottom. This will allow the blind to cover the window and allow for maximum window coverage. This is the Height of Blind 2. (Note: If the window sill protrudes then add only for allowance above the window.)